Hello again to you all!
This is 6th installment of this series of Freemotion pattern ideas based on the Wishbone pattern. In this blogpost I am focusing on changing the shape the loops of the Wishbone.
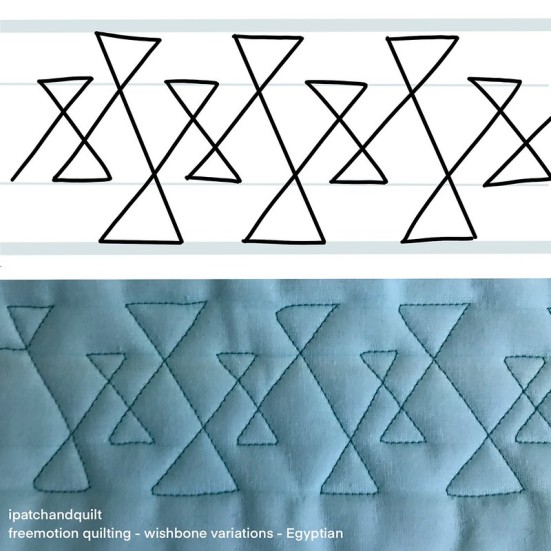
First up for today is this triangular design. The regular round loops are now turned into triangles. I did spruce it up a bit by changing heights. Click on this LINK to be directed to YouTube.
Animated tutorial Wishbone – 019 Egyptian.
While scrolling through Pinterest I encountered an image of a tutorial created by Lori Kennedy based on a the exact same idea of triangular wishbones. She has named this pattern ” Let’s Twist Again”. If you are not familiar with her work, please take a look at her wonderful tutorials. On het website, look for the tab ‘Motifs’. She has also written on freemotion which are filled with creative and fun ideas! (I am not affiliated to Lori Kennedy or any of her products. I just love what she creates.)
You can play around with the triangles a bit more.
- 2 loops, 2 triangles. A regular rhythm.
- 2 loops, 1 triangle. A bit more playful.
- 2 small loops, 2 large triangles.

Variations on tutorial 019 Egyptian
The triangles can become fishes or mermaid tails! These shapes wobble a lot as I struggled to keep the uniform, but this may just the dynamic look you are looking for! Click on this LINK to be directed to YouTube.

Animated tutorial Wishbone 020 – Fish Wish
The third tutorial in this blog post turned out actually easier to quilt than to draw. You can see the difference in size of the little ‘pearls’ inside the loops in the animation. The reason for this difference in the drawing is that for the animated tutorial to be smooth, I had to draw the shape in one go. The bigger ‘pearls’ made this harder to do in a live drawing. Click on this LINK to be directed to YouTube.

Animated tutorial Wishbone 021 – Pearl
Very recently I added micro handles to my HandiQuilter Avanté longarm. These handles are positioned lower on the machine and closer to the fabric. For me, this made such a difference in stitching out more intricate and small designs. I wish I had added the micro handles sooner to my machine. In the photo you see the normal handles (vertical) on the top and the micro handles underneath (more horizontal)

I know that working on a domestic machines resembles this setup with the micro handles as your hands are close to the needle. So in principe, a domestic sewing machine freemotion quilter should find these patterns easier to do than a longarmer without micro handles/adjustable handles. At least, that is what I think.
The loops with Pearls can of course:
- kiss/touch
- be alternated with smaller loops
- be alternated with regular loops

Variation on Wishbone tutorial 021 Pearl
When I was figuring out how to best stitch the loops with Pearls, my tired brain came up with a Pearl that was more centered inside of the loop … like a loop inside a loop. This pattern was way easier than the actual pearls I was trying to do.
But, you know what? These ‘Donut’ loops are actually quite fun! Click on this LINKto be directed to YouTube.

Animated tutorial Wishbone 022- Donut
And with the variations on this Donut pattern, you can try the same things as with the Pearls: alternating with regular loops and changing up the size.

Variations on Wishbone tutorial 022 Donut
My next blogpost will contain some more ideas for changing the loops in the Wishbones. After that I will start sharing ideas based on the Ribbon Candy pattern.
Until then!
Esther


Thank you so much, these are wonderful variations.
Thank you Helen! It is a fun project.
Esther
Fun variations on some of my favorite ways to quilt sashings!!!
Thank you very much! Please let me know how the patterns turn out.
Esther