This tutorial will focus on the more complex possibilities for the TWIST pattern.
The next set of ideas is based on stitching the TWIST pattern and on your way back, you add in the flourishes.
Here is the stitch path again for the basic TWIST pattern.

As you can see, the first pass (from left to right) stitches out 75% of the basic TWIST pattern, and the second pass (from right to left) finishes it off.
Before moving over to the next grid to finish the shape, you could pause there and add in flourishes.
It is important though to pre-mark where you want those flourishes to go. Believe me, you will make a mistake if you don’t mark!!!
If you feel this next tutorial is a bit too complicated but you would like to try the pattern, you could first stitch the TWIST blocks and the go back in for the details in the centers. You would have to travel on the lines you have just stitched. If that is not a problem, you don’t need the next tutorial.
Those of you who are working on a quilt that doesn’t allow much traveling, please try this next tutorial.
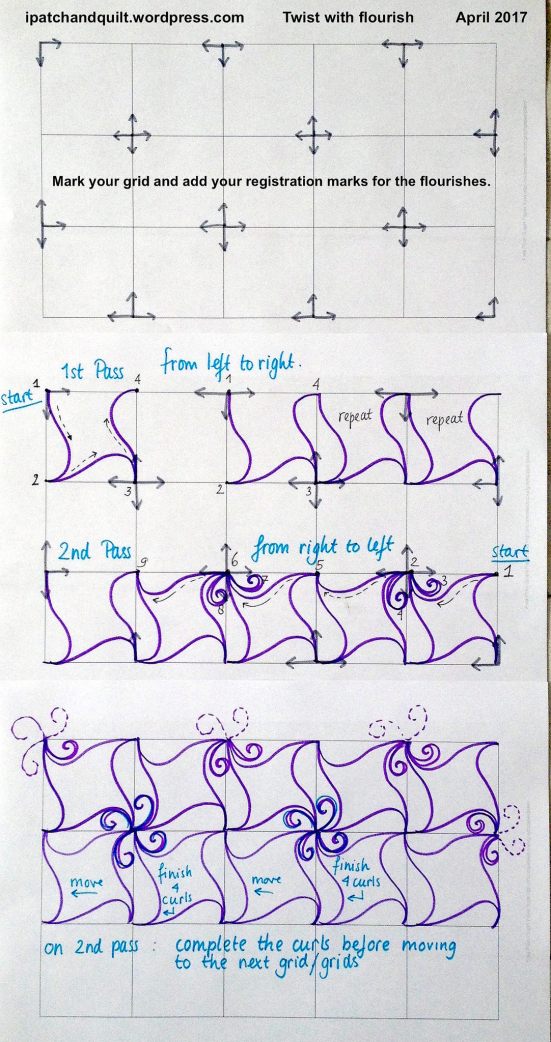
You could add anything like a curl, s-curves / flames or even feathers. Just make sure that your grid is large enough to have room for your flourishes. I have worked here with a 2 inch grid, and is was bit tight. Maybe you could let me know if a larger grid worked better?


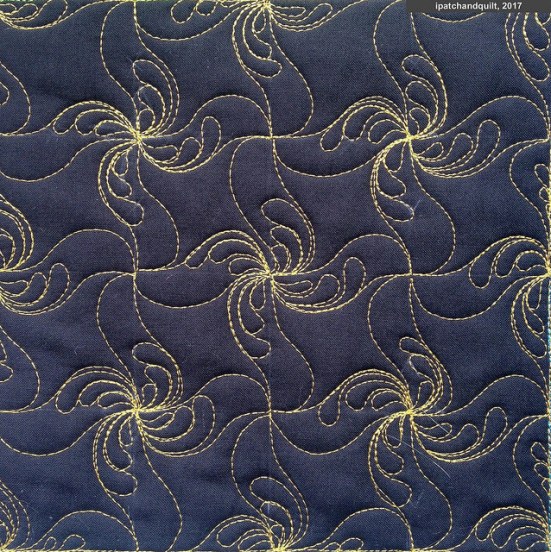
For those of you who would like a real challenge…
Here is my most difficult tutorial so far!
The idea is based on a mirrored TWIST shape, with added flourishes (echoes). The stitch path is different than before.

I have called this interlocking pattern ‘BUMP’. It is a tricky pattern as you are executing a partial pattern with each pass. The first pass is from left to right. The second pass from right to left. Please mark your quilt as much as you need.

The pattern interlocks, so the second row starts half way the pattern.
I love the look of this pattern, but I do realise that is maybe a bit too much work for a quilt that will be used for cuddling. Not to forget that all that stitchwork may create quite a stiff piece of fabric. Maybe it can be used on something like a clutch bag?
Where would you use these patterns?
Bye bye
Esther


I love the black/brown one with the aqua thread, it looks like tropical flowers 🙂 The designs are a bit dense for quilts, but for a bag or cushion cover they’d be fine, I think…
Yes it does look like a tropical flower. Big leaves with intense colors, I imagine.
Yes a cushion would be a great idea.
By the way, I really like your butterfly pillows. They’ll look great in the camper!
Hugs
Esther
They will, and the print is actually much nicer in real life than it looks in the photos 🙂
Thank you, these are very helpful. I like the grid, it’s a good way to keep the design consistent.
Hello,
Nice to meet you! Yes, exactly! I do like to keep these patterns consistent. Some designs look best if you’ll let them flow, like luxurious feathers and curl–hooks. Other patterns work best within a grid. I adore focussing on these for the moment.
Bye bye
Esther
I love looking at these designs! They’re so much fun. I may have to get up the guts to try one!
Hello Suzy!
Thank you for letting me inspire you. please, send me pictures if you have!
Bye bye
Esther
Very beautiful and floral, indeed. The first impression with your new design: orchids!
Happy Kingsday to you both! Yes, this pattern looks like orchids too!
Lots of hugs
Esther
Fabulous tutorial, Esther! You are making this so reachable. Thank you.
You are very welcome!
Hugs
Esther